分类存档: java

kotlin工程

最早建过一个kotlin工程,尝试了下kotlin的语法。

今天准备为我的app做一个收集日志的service时,发现eclipse中kotlin环境怎么配都无法成功。这个工程是在springboot上建立bootstrap下载下来后使用的。

仔细对比了两个工程,发现,我之前建立的工程中有kotlin builder,而新的工程中则是gradle builder。

找到原因了,在工程名上右键 configure kotlin->add native plugin,然后会添加上kotlin builder。

但是看网上信息,native plugin只是解决java和kotlin代码同时在工程中的问题。

在eclipse中没找到办法解决,在idea中尝试一下。

kotlin中报无法支持1.8的lib,在idea中可以修改kotlin支持1.8,但eclipse中未找到哪里可以修改。

build.gradle中各种插件问题修复后,在idea中可以正常使用了。现在就回到最初的问题了,在idea中运行时,怎么优先使用test/resources。

最终也没好办法,写了一个testcase来启动springboot。但在testcase中启动后就立即退出是怎么回事?查找下原因。立即即出,就在启动springboot后,sleep(xxxxxx)的时间来阻止进程进出就可以了。


目前的几种解决方案:

1、写一个testcase启动springboot,直接会使用test resources。(成功)

2、直接启动App.java或使用gradle bootrun,通过 vm parameter将环境变量传递过去。(正在测试中)

3、写一个properties文件,放在test resources下,启动时,优先去读取properties中设置的属性。(或者放在正式目录下的resources下)


关于如何传递环境变量(程序可以直接读取环境变量,因此可以不使用-D来传递)

1、jar包传递环境变量

gradle bootjar打包出来的jar包,可以用java -Dlogback.syslogHost=xxx -jar xxx.jar传递环境变量。

2、gradle bootRun 使用-D传递环境变量,需要设置以下属性。

bootRun {
    //classpath configurations.testRuntime
   systemProperties = System.properties
}

3、再查看下怎么使用bootrun从properties中设置环境变量。

在junit中,会加载logback-test.properties,那能在debug模式中使用吗。只要是junit都会加载test resources。

那这样来说,debug模式本就不应该去加载test resources,也是正确的处理方式,只有test模式时才需要去加载 test resources。

费这牛鼻子劲干啥,直接写个脚本,参数通过环境变量传递不就OK啦。

或者bootrun时,能判断出来,主动去加载一个也可以。

spring boot 加载顺序

https://docs.spring.io/spring-boot/docs/current/reference/html/boot-features-external-config.html

Spring Boot uses a very particular PropertySource order that is designed to allow sensible overriding of values. Properties are considered in the following order:

    Devtools global settings properties on your home directory (~/.spring-boot-devtools.properties when devtools is active).
    @TestPropertySource annotations on your tests.
    @SpringBootTest#properties annotation attribute on your tests.
    Command line arguments.
    Properties from SPRING_APPLICATION_JSON (inline JSON embedded in an environment variable or system property).
    ServletConfig init parameters.
    ServletContext init parameters.
    JNDI attributes from java:comp/env.
    Java System properties (System.getProperties()).
    OS environment variables.
    A RandomValuePropertySource that has properties only in random.*.
    Profile-specific application properties outside of your packaged jar (application-{profile}.properties and YAML variants).
    Profile-specific application properties packaged inside your jar (application-{profile}.properties and YAML variants).
    Application properties outside of your packaged jar (application.properties and YAML variants).
    Application properties packaged inside your jar (application.properties and YAML variants).
    @PropertySource annotations on your @Configuration classes.
    Default properties (specified by setting SpringApplication.setDefaultProperties).

还得看下spring loaded与kotlin的结合中。

还得看下devtool的作用。

下面开始测试下 devtool 与 springloaded,主要就是controller,接口增加,修改,删除是否能立即生效。

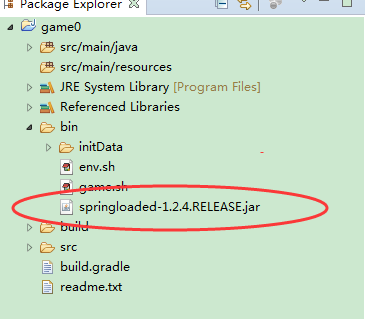
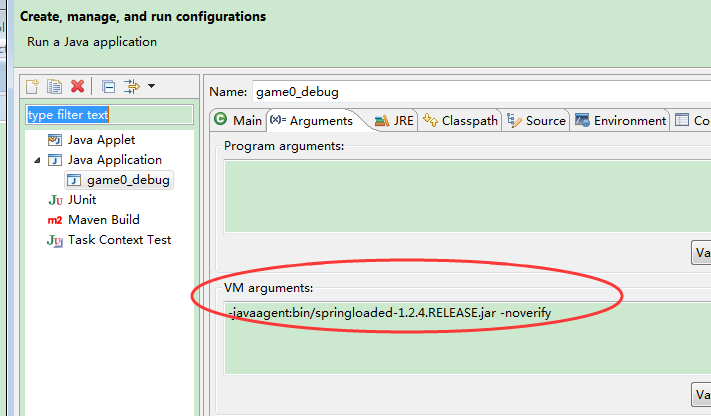
记得之前用eclipse+java app+springloaded,增加方法都支持。

在外部运行gradlew.bat bootrun

1、使用devtool

2、使用springloaded,从环境变量传入

3、使用springloaded,从build.gradle中配置

直接运行App.kt

1、好像只能使用环境变量来配置了吧。

Json web token (JWT) 相关介绍

最近看了vuejs,看到了vue-auth中一个jwt-auth,发现几年不关注,前端完全是全新的领域了。

这里列下jwt相关的资源,供快速了解jwt.

https://jwt.io/introduction/

https://github.com/szerhusenBC/jwt-spring-security-demo

https://www.toptal.com/java/rest-security-with-jwt-spring-security-and-java

spring boot security如何集成JWT.

java相关的jwt库太多了。

apache有oltu

spring有spring-security-jwt

还有其它一些第三方开源库

1、服务器端添加 jwt 支持:

配置spring security

package com.elex.gm.spring;

import java.security.SecureRandom;

import org.springframework.beans.factory.annotation.Autowired;
import org.springframework.context.annotation.Bean;
import org.springframework.context.annotation.Configuration;
import org.springframework.security.config.annotation.authentication.builders.AuthenticationManagerBuilder;
import org.springframework.security.config.annotation.web.builders.HttpSecurity;
import org.springframework.security.config.annotation.web.builders.WebSecurity;
import org.springframework.security.config.annotation.web.configuration.EnableWebSecurity;
import org.springframework.security.config.annotation.web.configuration.WebSecurityConfigurerAdapter;
import org.springframework.security.crypto.bcrypt.BCryptPasswordEncoder;
import org.springframework.security.web.authentication.UsernamePasswordAuthenticationFilter;

import com.elex.gm.service.UserManager;
import com.elex.gm.spring.jwt.JWTAuthenticationFilter;
import com.elex.gm.spring.jwt.JWTLoginFilter;

@Configuration
@EnableWebSecurity
public class SecurityConfig extends WebSecurityConfigurerAdapter {

    @Bean
    public BCryptPasswordEncoder passwordEncoder() throws Exception {
        return passwordEncoder;
    }

    public void configure(WebSecurity web) throws Exception {
        web.ignoring().antMatchers("/static/**").antMatchers("/hello/**").antMatchers("/api/open/**");
    };

    @Override
    protected void configure(HttpSecurity http) throws Exception {
        http

                .authorizeRequests()

                .antMatchers("/api/gm/**").hasAnyRole("ADMIN", "USER")

                .antMatchers("/api/user/**").hasAnyRole("USER")

                .and()

                .formLogin()

                .loginProcessingUrl("/api/user/login")

                .permitAll()

                .and()

                .logout()

                // .logoutUrl("/api/open/logout")

                .and()

                .httpBasic()

                .and()

                .addFilterBefore(new JWTLoginFilter("/api/user/login", authenticationManager()),
                        UsernamePasswordAuthenticationFilter.class)

                .addFilterBefore(new JWTAuthenticationFilter(), UsernamePasswordAuthenticationFilter.class);

        http.csrf().disable();
        http.headers().frameOptions().disable();
    }

    @Override
    protected void configure(AuthenticationManagerBuilder auth) throws Exception {
        auth.userDetailsService(userManager).passwordEncoder(passwordEncoder);
    }

    @Autowired
    public void configureGlobal(AuthenticationManagerBuilder auth) throws Exception {
    }

    @Autowired
    private UserManager userManager;

    private BCryptPasswordEncoder passwordEncoder = new BCryptPasswordEncoder(16,
            new SecureRandom("j^E1)y*)HL2gT,es+ODa!0+j^L1I3+6I".getBytes()));
}


JWTLoginFilter:

package com.elex.gm.spring.jwt;

import java.io.IOException;
import java.util.Map;

import javax.servlet.FilterChain;
import javax.servlet.ServletException;
import javax.servlet.http.HttpServletRequest;
import javax.servlet.http.HttpServletResponse;

import org.springframework.http.HttpStatus;
import org.springframework.security.authentication.AuthenticationManager;
import org.springframework.security.authentication.UsernamePasswordAuthenticationToken;
import org.springframework.security.core.Authentication;
import org.springframework.security.core.AuthenticationException;
import org.springframework.security.jwt.Jwt;
import org.springframework.security.jwt.JwtHelper;
import org.springframework.security.web.authentication.AbstractAuthenticationProcessingFilter;

import com.alibaba.fastjson.JSON;
import com.elex.gm.model.User;
import com.google.common.collect.Lists;
import com.google.common.collect.Maps;

public class JWTLoginFilter extends AbstractAuthenticationProcessingFilter {

    public JWTLoginFilter(String defaultFilterProcessesUrl, AuthenticationManager authenticationManager) {
        super(defaultFilterProcessesUrl);
        setAuthenticationManager(authenticationManager);
    }

    @Override
    public Authentication attemptAuthentication(HttpServletRequest request, HttpServletResponse response)
            throws AuthenticationException, IOException, ServletException {

        String username = request.getParameter("username");
        String password = request.getParameter("password");

        if (username == null) {
            username = "";
        } else {
            username = username.trim();
        }
        if (password == null) {
            password = "";
        } else {
            password = password.trim();
        }
        return getAuthenticationManager()
                .authenticate(new UsernamePasswordAuthenticationToken(username, password, Lists.newArrayList()));
    }

    @Override
    protected void successfulAuthentication(HttpServletRequest request, HttpServletResponse response, FilterChain chain,
            Authentication authResult) throws IOException, ServletException {
        User user = (User) authResult.getPrincipal();

        Map<String, Object> tokenMap = Maps.newHashMap();
        tokenMap.put("id", user.getId());
        tokenMap.put("name", user.getUsername());
        tokenMap.put("roles", user.getRoles());
        Jwt jwt = JwtHelper.encode(JSON.toJSONString(tokenMap), JWTKey.hmac);

        String token = jwt.getEncoded();
        response.setHeader("Authorization", token);
    }

    @Override
    protected void unsuccessfulAuthentication(HttpServletRequest request, HttpServletResponse response,
            AuthenticationException failed) throws IOException, ServletException {
        response.setStatus(HttpStatus.UNAUTHORIZED.value());
    }

}

JWTAuthentication:

package com.elex.gm.spring.jwt;

import java.io.IOException;
import java.util.List;

import javax.servlet.FilterChain;
import javax.servlet.ServletException;
import javax.servlet.ServletRequest;
import javax.servlet.ServletResponse;
import javax.servlet.http.HttpServletRequest;

import org.apache.commons.lang3.StringUtils;
import org.springframework.security.authentication.UsernamePasswordAuthenticationToken;
import org.springframework.security.core.Authentication;
import org.springframework.security.core.authority.SimpleGrantedAuthority;
import org.springframework.security.core.context.SecurityContextHolder;
import org.springframework.security.jwt.Jwt;
import org.springframework.security.jwt.JwtHelper;
import org.springframework.web.filter.GenericFilterBean;

import com.alibaba.fastjson.JSON;
import com.alibaba.fastjson.JSONObject;
import com.google.common.collect.Lists;

public class JWTAuthenticationFilter extends GenericFilterBean {
    private static final String JWT_HEADER = "Authorization";

    @Override
    public void doFilter(ServletRequest request, ServletResponse response, FilterChain chain)
            throws IOException, ServletException {
        try {
            String token = ((HttpServletRequest) request).getHeader(JWT_HEADER);
            Jwt jwt = JwtHelper.decodeAndVerify(token, JWTKey.hmac);
            JSONObject json = JSON.parseObject(jwt.getClaims());

            String username = json.getString("name");
            String roles = json.getString("roles");
            List<SimpleGrantedAuthority> list = Lists.newArrayList();
            if (!StringUtils.isEmpty(roles)) {
                for (String role : roles.split(",")) {
                    if (!StringUtils.isEmpty(role)) {
                        list.add(new SimpleGrantedAuthority("ROLE_" + role));
                    }
                }
            }
            Authentication authentication = new UsernamePasswordAuthenticationToken(username, null, list);
            SecurityContextHolder.getContext().setAuthentication(authentication);
        } catch (Exception e) {
            // e.printStackTrace();
        }
        chain.doFilter(request, response);
    }
}

如何判断是否为中国IP

收到一个需求,需要判断IP是否来自中国。

判断IP来源,很早之前自己也感兴趣,一直没有去了解如何实现。

今天正好搜索了一下相关的文章。

亚洲所有相关分配的IP段可以从 http://ftp.apnic.net/apnic/stats/apnic/delegated-apnic-latest 查询。

从里面解释后即可实现判断IP是否为中国。

没有找到java的代码,就自己写了一份,供其它朋友使用。

将下载下来的 delegated-apnic-latest 放在 classpath下即可。

import java.io.InputStream;
import java.nio.charset.StandardCharsets;
import java.util.Collections;
import java.util.List;
import java.util.Map;

import org.apache.commons.io.IOUtils;
import org.apache.commons.lang3.StringUtils;
import org.assertj.core.util.Lists;
import org.slf4j.Logger;
import org.slf4j.LoggerFactory;

import com.google.common.collect.Maps;

public class IpUtil {
    private static final String FILE_NAME = "delegated-apnic-latest";

    // 只存放属于中国的ip段
    private static Map<Integer, List<int[]>> chinaIps = Maps.newHashMap();
    static {
        init();
    }

    public static void init() {
        try {
            // ip格式: add1.add2.add3.add4
            // key为 : add1*256+add2
            // value为int[2]: int[0]存的add3*256+add4的开始ip int[4]存的结束ip
            Map<Integer, List<int[]>> map = Maps.newHashMap();

            InputStream input = Thread.currentThread().getContextClassLoader().getResourceAsStream(FILE_NAME);
            List<String> lines = IOUtils.readLines(input, StandardCharsets.UTF_8);
            for (String line : lines) {
                if (line.startsWith("apnic|CN|ipv4|")) {
                    // 只处理属于中国的ipv4地址
                    String[] strs = line.split("\\|");
                    String ip = strs[3];
                    String[] add = ip.split("\\.");
                    int count = Integer.valueOf(strs[4]);

                    int startIp = Integer.parseInt(add[0]) * 256 + Integer.parseInt(add[1]);
                    while (count > 0) {
                        if (count >= 65536) {
                            // add1,add2 整段都是中国ip
                            chinaIps.put(startIp, Collections.EMPTY_LIST);
                            count -= 65536;
                            startIp += 1;
                        } else {

                            int[] ipRange = new int[2];
                            ipRange[0] = Integer.parseInt(add[2]) * 256 + Integer.parseInt(add[3]);
                            ipRange[1] = ipRange[0] + count;
                            count -= count;

                            List<int[]> list = map.get(startIp);
                            if (list == null) {
                                list = Lists.newArrayList();
                                map.put(startIp, list);
                            }

                            list.add(ipRange);
                        }
                    }
                }
            }
            chinaIps.putAll(map);
        } catch (Exception e) {
            logger.error("ERROR", e);
        }
    }

    public static boolean isChinaIp(String ip) {
        if (StringUtils.isEmpty(ip)) {
            return false;
        }
        String[] strs = ip.split("\\.");
        if (strs.length != 4) {
            return false;
        }
        int key = Integer.valueOf(strs[0]) * 256 + Integer.valueOf(strs[1]);
        List<int[]> list = chinaIps.get(key);
        if (list == null) {
            return false;
        }
        if (list.size() == 0) {
            // 整段都是中国ip
            return true;
        }
        int ipValue = Integer.valueOf(strs[2]) * 256 + Integer.valueOf(strs[3]);
        for (int[] ipRange : list) {
            if (ipValue >= ipRange[0] && ipValue <= ipRange[1]) {
                return true;
            }
        }

        return false;
    }

    private static final Logger logger = LoggerFactory.getLogger(IpUtil.class);
}


如果扩展这个代码后,可以增加判断IP属于哪个国家。

如果在判断IP属于哪个城市,可能得需要 http://dev.maxmind.com/zh-hans/geoip/geoip2/


参考:

https://www.zhihu.com/question/19794443

http://xixitalk.github.io/blog/2013/03/11/func-is-china-ip/


Cannot open Eclipse Marketplace 错误

国内网络环境果真复杂。

今天使用eclipse遇到这个问题,推测这个问题只出现在国内。

http://blog.csdn.net/cashcat2004/article/details/43819517

按国内同僚的解决方法:

在eclipse.ini中添加

找来找去没找到解决办法,在stackoverflow中终于看到描述,在eclipse.ini中增加
 -Djava.NET.preferIPv4Stack=true

重启eclipse后顺利连上。

jni错误 UnsatisfiedLinkError

很久没写过jni了。这次项目中用到,准备使用vs2015生成dll,供java调用。我用premake5生成了vs2015项目,但生成出来的dll,无法在java中调用,报以下错误:

Exception in thread "main" java.lang.UnsatisfiedLinkError: RecastLib.hello()V
    at RecastLib.hello(Native Method)
    at RecastLib.main(RecastLib.java:22)

使用vs2015中的工具 dumpbin 查看dll中的方法:

          1    0 00001200 ?Java_RecastLib_hello@@YAXPEAUJNIEnv_@@PEAV_jobject@@@
Z = ?Java_RecastLib_hello@@YAXPEAUJNIEnv_@@PEAV_jobject@@@Z (void __cdecl Java_R
ecastLib_hello(struct JNIEnv_ *,class _jobject *))
          2    1 00001220 ?_Java_RecastLib_hello@@YAXPEAUJNIEnv_@@PEAV_jobject@@
@Z = ?_Java_RecastLib_hello@@YAXPEAUJNIEnv_@@PEAV_jobject@@@Z (void __cdecl _Jav
a_RecastLib_hello(struct JNIEnv_ *,class _jobject *))

发现 vs2015 编译的方法名全部被添加上了@后缀。

正确的应该是:

    ordinal hint RVA      name

          1    0 00011091 Java_RecastLib_hello = @ILT+140(Java_RecastLib_hello)

这是因为 vc++中的 Name Mangling:

	JNIEXPORT void JNICALL Java_RecastLib_hello
		(JNIEnv *, jobject);

如果要导出的cpp中使用了c++特性,即使指定为 extern “C” 也受Name Mangling的影响。

这里可以定义一个  java.def 文件也解决。定义如下:

LIBRARY recastDll
EXPORTS
  Java_RecastLib_hello

然后在vs2015的链接器中定义:

这样导出的函数即不会受name mangling 的影响。

除此之外,还可以使用  RegisterNatives 的方式将函数入口注入java vm(两种试并无性能差异)。

如下:

static JNINativeMethod s_methods[] = {
	{ "jniHello", "()V", (void*)Java_RecastLib_hello },
	{ "jniLoad",  "(Ljava/lang/String;)I", (void*)Java_RecastLib_load },
	{ "jniFind",  "(FFFFFF)Ljava/util/List;", (void*)Java_RecastLib_find }
};
JNIEXPORT jint JNICALL
JNI_OnLoad(JavaVM *vm, void *reserved)
{
	JNIEnv* env = NULL;
	if (vm->GetEnv((void**)&env, JNI_VERSION_1_8) != JNI_OK)
	{
		return JNI_ERR;
	}
	jclass cls = env->FindClass("LRecastLib;");
	if (cls == NULL)
	{
		return JNI_ERR;
	}
	int len = sizeof(s_methods) / sizeof(s_methods[0]);
	if (env->RegisterNatives(cls, s_methods, len) < 0)
	{
		return JNI_ERR;
	}
	return JNI_VERSION_1_8;
}

springloaded开发过程中节省大量时间

之前开发中如果要修改代码,不需要重启直接生效,需要在eclipse中的debug模式下。

但是依旧受到很多限制,不能增加/删除/修改方法和属性等。

今天上spring.io,又看到了springloaded,感觉这东西经过一年应该很完善了,试了一下,惊为神器啊。

如下图:springloaded包放在工程中。

然后配置环境:

在debug环境加,方法可以随意添加,新添加的方法中设置断点也不会出问题,和原来增加一个方法就要重启一遍相比,太强大了。

游戏中数据包的压缩

我们游戏中数据包比较大时,就使用7z进行压缩后,再传给客户端。

最近压力测试时,发现一个坑,查了几天,才定位是使用的7z库的问题。

java中没有官方的7z库,也没有开源组织维护,只有一个作者自己写的7z库,最初没发现问题。

这次查看7z的源码,发现里面每次压缩时会分配16M内存,大量的分配释放内存导致整个jvm都被卡了。

没办法改为gzip库,来避免掉了这种问题。

关于压缩实际还有很多潜力可以挖掘。

1、比如:压缩解压每个数据块中有crc32校验,我们游戏中使用,可以直接去掉这部分计算。

2、比如:既然不使用crc32校验证,那crc32占用的那几个字节就可以省掉。

3、比如:既然前后端都知道使用相同的压缩算法,就可以把压缩文件的格式文件头去掉。

4、比如:每次压缩解压都会申请byte[],我们可以使用threadlocal复用byte[],来减少byte[]的分配。


记一次排查内存泄露

今天一台java帐号服上报了outofmemory,这种错误出现,大多数情况都是有内存泄露导致的。

看程序运行目录下自动生成了 java_pid32123.hprof 文件。这是java自动dump出来的文件,里面记录了内存不足时的内存信息。

可以用jhat打开hprof文件。

耗时会比较长,耐心等待。

上面的7000,是指打开了一个http 7000端口,我们可以通过浏览器进行查看。

通过浏览器打开后,拉到最后面:

点击show instance counts for all classes

看到最上面几行,基本上就可以确认了SocketRunner出现了内存泄露。

生成了大量socketrunner,导致无法及时处理,最终耗尽了所有内存。

java threading

一个老外哥们实现的non-blocking future,可是写法未免太反人类了点。

看来java处理这方面果真是弱项。

http://stackoverflow.com/questions/826212/java-executors-how-to-be-notified-without-blocking-when-a-task-completes

http://fasterjava.blogspot.de/2014/09/writing-non-blocking-executor.html

看要要转向vertx.io / skynet 比较好一些。

mysql jdbc failover

因为项目中有多个cobar节点,现在只是连接的单一cobar节点,想修改为连接多个cobar节点,失败后,自动切换至其它节点。

原来看druid时,印象中有druid-ha,高高兴兴拿过来用,发现无法使用,再看源码,发现根本就没实现嘛。

在网上搜索了下,相关的资源也不是非常多。

好在需求很简单可以自已来造个轮子。

代码如下:

package cn.joylab.game.util;

import java.sql.Connection;
import java.util.List;

import javax.sql.DataSource;

import org.apache.commons.lang.math.RandomUtils;
import org.apache.commons.logging.Log;
import org.apache.commons.logging.LogFactory;
import org.springframework.jdbc.datasource.AbstractDataSource;

public class HADataSource extends AbstractDataSource {

	private List<DataSource> targetDataSources;
	private int index = RandomUtils.nextInt(2);

	public List<DataSource> getTargetDataSources() {
		return targetDataSources;
	}

	public void setTargetDataSources(List<DataSource> targetDataSources) {
		this.targetDataSources = targetDataSources;
	}

	public Connection getConnection() {
		log.info("getConnection()");
		for (int m = 0; m < targetDataSources.size(); m++) {
			try {
				DataSource dataSource = targetDataSources.get(index);
				Connection conn = dataSource.getConnection();
				log.info("getConnenction success from index : " + index);
				return conn;
			} catch (Exception e) {
				index = (++index) % targetDataSources.size();
				log.error("ERROR", e);
			}
		}
		throw new RuntimeException("db connection error");
	}

	public Connection getConnection(String username, String password) {
		log.info("getConnection() with username and password");
		return null;
	}

	private static final Log log = LogFactory.getLog(HADataSource.class);
}

只是简单的进行下datasource的切换。


Warning: Use of undefined constant XML - assumed 'XML' (this will throw an Error in a future version of PHP) in /opt/wordpress/wp-content/plugins/wp-syntaxhighlighter/wp-syntaxhighlighter.php on line 1048